Changing a network device in a production network is a common task handled by IT operations. It commonly involves highly coordinated efforts from engineering and operations, as well as detailed change management scheduling, involving any businesses that could be effected by the change. Changing a network device will at minimum cause a service outages which can vary based on the nature and complexity of the change.
Reasons for a device swap include:
- Upgrade for more capacity
- Downgrade of a device for cost savings
- Change to newer model (existing device is going out of warranty or no longer support)
- Change to add a hardware related feature (additional interfaces, encryption, VOIP…etc.)
- Changing to a new vendor with specialized feature benefits
Traditionally, for a new network device to be deployed, senior network engineers perform stringent lab testing on the new device to validate and certify. Next, in coordination with the change management team, a network engineer will be required to build the new configurations for each of the new devices going in the network. To ensure the change goes successfully, the network engineers are also typically part of the change team lead by network operations.
Using Gluware Control to perform a device swap, the burden on network engineering is greatly reduced. It is still highly recommended that a qualification and validation be performed on the new device. After that, IT operations can handle the change themselves since Gluware Control will automatically map over all of the configuration components to the new device. Gluware’s model-driven approach and intelligent orchestration engine simplify the process of the device swap, saving time and virtually eliminating common configuration errors. This alleviates the time consuming task of re-building the configuration by hand, or the effort to write a script to convert configuration files.
5 Step Process to Swap a Device
A device swap using Gluware can be accomplished in a few minutes of configuration time using Gluware Control, plus the time it takes to provision the device which depends on the complexity of the configuration, but usually adds some time. In addition to the time, risk and effort savings to the engineering staff, this reduces the impact of the outage (i.e. change window) on the broader business units to minutes vs the usual hours involved with such changes.
In this example the CPE branch router “MDW-01” is being upgraded from an ISR1931 to an ISR4431.
1. A Global instance which defines the port mappings for the new ISR4431 must be created (or cloned from an existing instance). This enables the Gluware orchestration engine to properly map the LAN and WAN interfaces to the physical ports on the device.
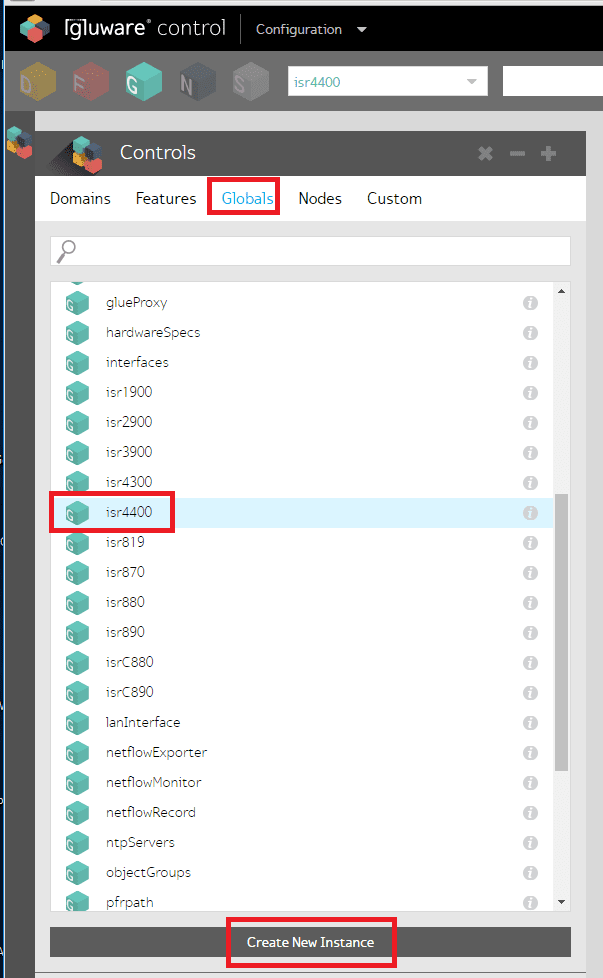
In this example, the new Global is an ISR 4331, so from the Globals list in Gluware Control use the option to “Create a New Instance”:
In the Controls Panel: Select Globals, select isr4400 and click “Create New Instance”
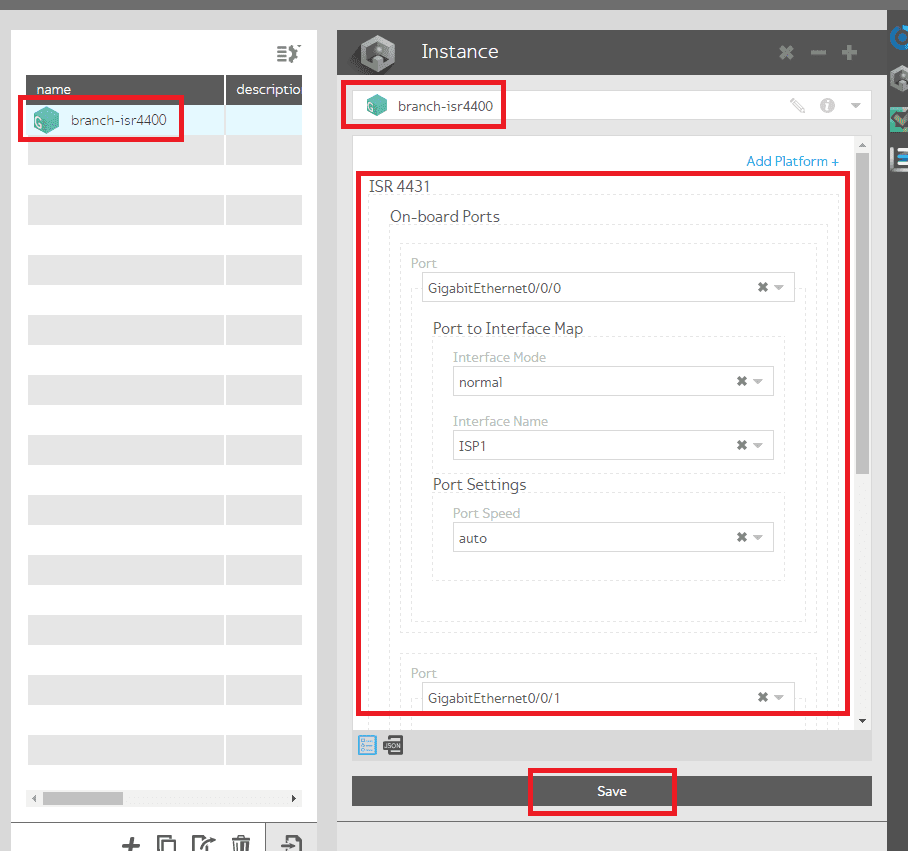 Click on the branch-isr4400 to open the instance and configure the parameters in the panel, then click “Save” changes
The key task in this step is to properly map the interface modes (abstractions) to the physical interfaces. In this case it is pretty straight forward since there is a single WAN facing port GE0/0/0 (called ISP1) and a single customer LAN facing port GE0/0/1 (called VLAN101).
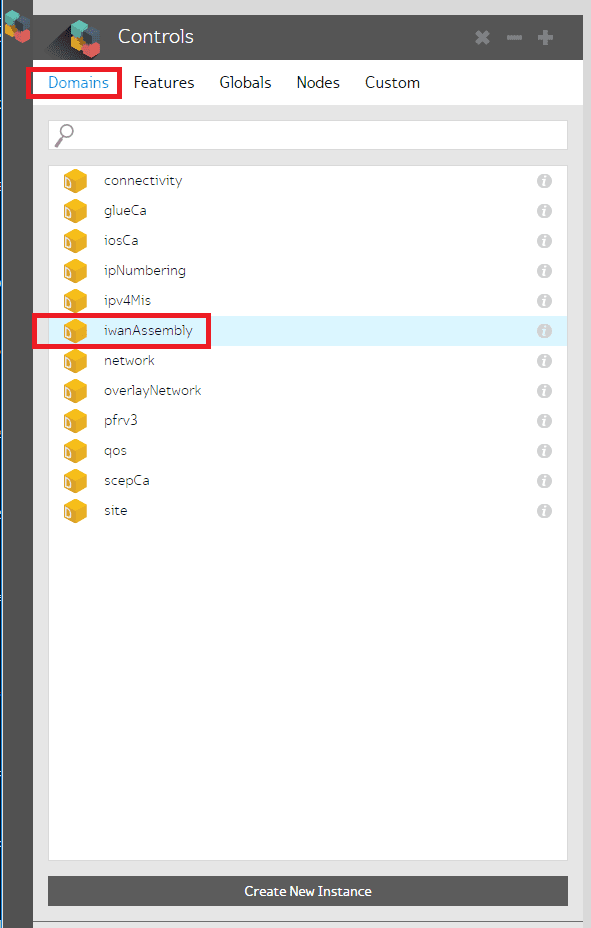
2. Update the Domain for the Assembly instance, in this case the iwanAssembly, to add the platform for the “branch-isr4400”. The assembly designates all the features to be provisioned on a given node which in this case is the routing, IP addressing, QoS Zone-based Firewall, QoS and more.
In the Controls Panel: Select Domains, select iwanAssembly
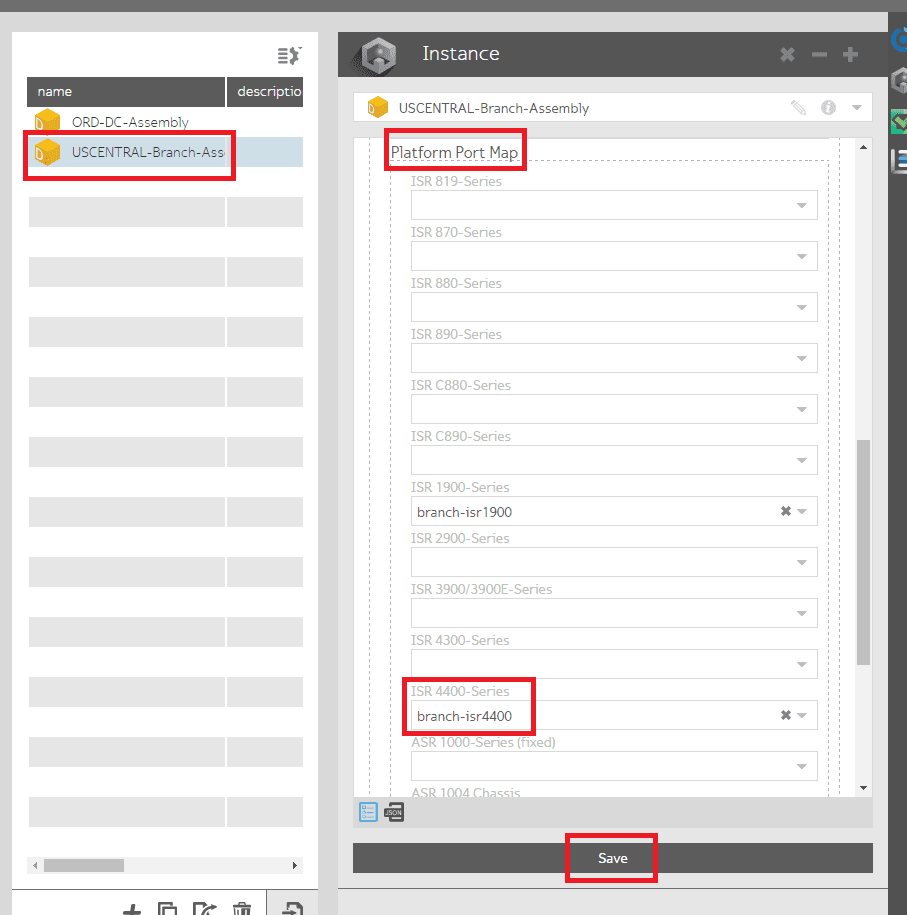
Select the Assembly and edit the Instance to add the new branch-isr4400 to the Platform Port Map, then click “Save”
An optional task is to remove the branch-isr1900 mapping if it will no longer be used by by other nodes sharing the same Assembly.
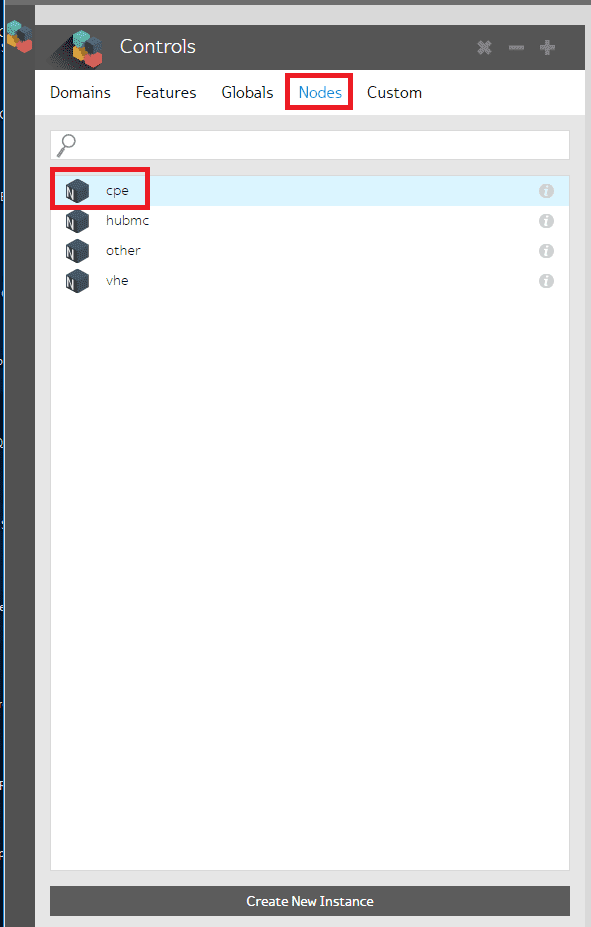
3. The last configuration step is to update the Node definition for the CPE.
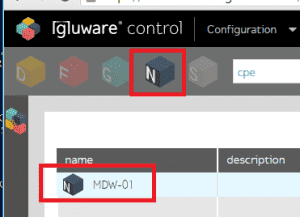
In the Controls Panel: Select Nodes, select cpe
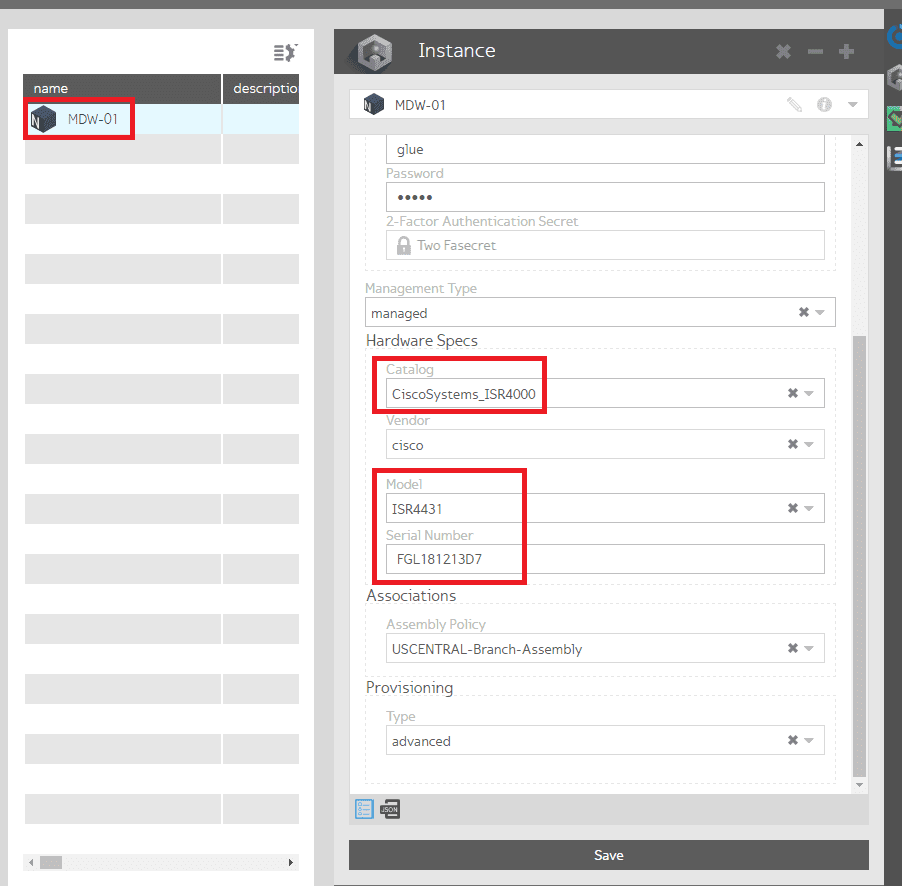
Select the Node and edit the Instance to update the Hardware Specs including the Catalog, Model and Serial Number. The Assembly and Provisioning type should remain the same, then click “Save”
Note – the Node instance must also have the proper credentials (username /password) defined to access it remotely for advanced mode. Another option is to use zero-touch provisioning to create a bootable USB image for the router.
4. Now that the new router is ready to be provisioned, access the old ISR1921 router (typically out-of-band since we will be shutting down the interfaces), and issue the commands to shut down the LAN and WAN interfaces. Next, access the new ISR4431 and enable the LAN and WAN interfaces in the same fashion.
In configuration mode perform a “shut” on the old router interfaces and a “no shut” on the new router interfaces
Note – the new router must have the same IP address configured on the WAN interface for in-band access and have the credentials defined for remote access.
5. The final step is to start provisioning the Node:
In the Node view, select the MDW-01 device to be provisioned
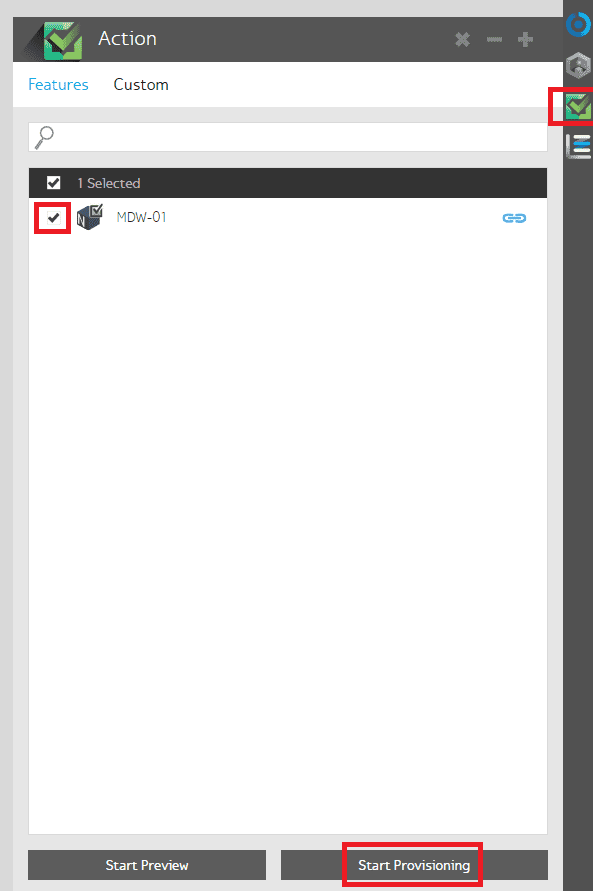
Select the Actions Panel and check the box for the node to be provisioned then click “Start Provisioning”
Note: Though this example provisions the device immediately, a Preview option also exists within the Action Panel to inspect the logs for the upcoming provisioning, or generate the resulting CLI configuration for the device ahead of the provisioning for validation or change management purposes.
During the provisioning the Grid view shows a summary of the status and any if any errors occur
The provisioning progress can be verified in the detailed Log view (using the Logs Panel) as well as – in the summary columns of the Workspace/Grid view to ensure all the configured features have been provisioned correctly. Gluware also provides console access to the device (using the Terminal Panel) if an IT engineer wants to manually validate the configuration state after the swap.
Leveraging the Gluware Software Defined Network Orchestration (SDNO) platform will dramatically save time and resources through lifecycle management of a device or service from initial provisioning (or device swap) through daily operations and configuration management.
Click here to request a demonstration of Gluware today!

